Showing posts with label tutorial. Show all posts

27 June 2010

Batch Processing Tutorial

First, you need to create a photoshop action.


How to create Photoshop Actions?
Go to:
Window > Actions
The Action Box should appear on the right.
Now open a photo so we could record an action that we'll apply to a batch of photos later (this can help you save lots of time).
I usually do this after conventions. Because I'm too lazy to edit each one of them

16 June 2010

Chibi shot tutorial

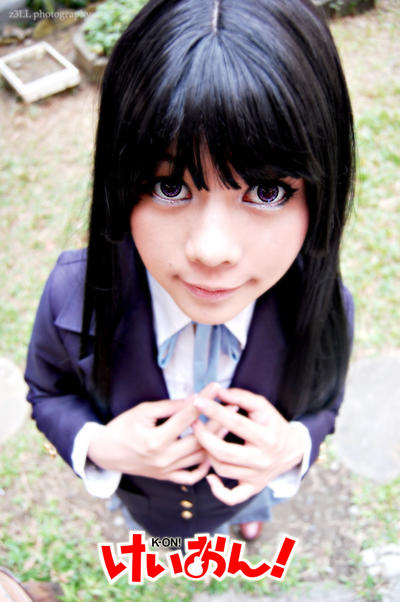
 Sample Chibi shots below:


You'll be needing the following:
  1. A camera with a Kit lens or any wider lens (18mm or wider).
  2. Anything you can step on (rock, table, chairs, etc), unless you're really tall.
  3. A model of course 8D
Step 1:
Adjust your focal length to its widest mode (18mm for my kit lens).


Step 2:
Make yourself higher than the model (step on a chair, etc). Refer to the 2nd photo


Step 3:
Adjust your framing, chibi shots looks better when closer (bigger heads), include the feet to make it look cuter. Of course you can experiment and adjust to what you think looks better.

11 June 2010

Panorama Tutorial

PANORAMA
I learned this one from Master Rap

Taking the shot:
  • Take 2 or more shots
  • You can use a tripod (recommended but not required)
  • Make sure your shots have the same focus and exposure so you can stitch them all together perfectly.
  • Tip: you can switch your lens to manual mode after the first shot, to avoid changing focus length.

Esplanade, Singapore Flyer and the Marina Bay Reservoir

Photo-stitching:
Use Adobe Photoshop (i'm not familiar with other versions.. this one's for CS3 and CS4)
  1. File
  2. Automate
  3. Photomerge
  4. Cylindrical


Note: make sure the filenames are in order, too (from left to right) otherwise you can't stitch them (or atleast at CS3, CS4).

Other Related post(s):
Chibi Shot Tutotial